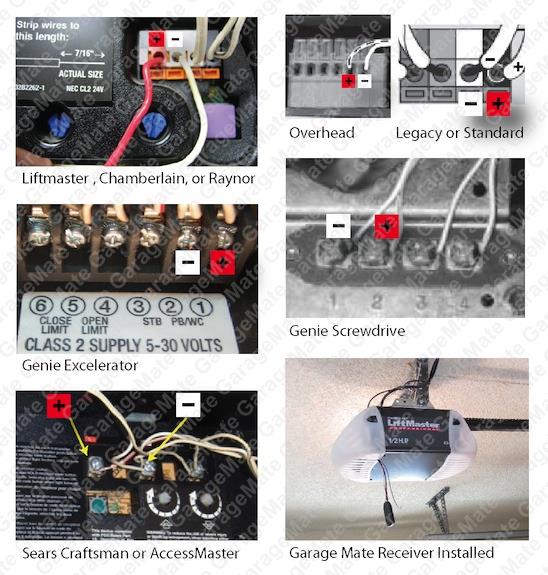
Liftmaster Wiring Diagram Sensors
Liftmaster Wiring Diagram Sensors - Web attach the two black striped wires under screw terminal 3. This diagram provides a visual guide for installation and troubleshooting of. Web • secure sensors with the hardware shown in figure 6. Web get the liftmaster garage door support you need from chamberlain group. Regular inspection and prompt troubleshooting will help keep your garage door system safe and reliable. Securely tighten the sending eye wing nut.
Web learn how to wire a liftmaster sensor with a detailed wiring diagram. Turn both the ac power and battery switches to off position before installing or servicing operator. Web we can identify the model of your liftmaster garage door opener by locating the model number on the motor unit. To reduce the risk of injury or death: Web attach the two black striped wires under screw terminal 3.
The wire diagram shows the solenoid lock connections incorrectly. Web the sensor wiring is simple but takes time to do. Web overall, wiring a liftmaster garage door opener involves connecting the power supply, safety sensor wires, wall control panel wires, and remote control wires. Turn both the ac power and battery switches to off position before installing or servicing operator. Safety symbol and signal word review.
Liftmaster Sensor Wiring Diagram

Web get the liftmaster garage door support you need from chamberlain group. Finger tighten the wing nut on the receiving eye to allow for final adjustment. You can also find the model information in the owner's manual or on the manufacturer's website. The green indicator lights should be lit and the lights should be solid, not blinking. Remove the wires.
12+ map sensor wiring diagram IshaIzabella

They can operate at ranges up to 90' and when. When the sensors light up, press the remote to close the door. Web a wiring diagram for liftmaster professional garage door openers, including the wiring connections for sensors, wall buttons, motor, and power supply. This number is crucial for obtaining the correct wiring diagram. Safety symbol and signal word review.
How to Wire an Enforcer Photo Eye A StepbyStep Diagram Guide

To reduce the risk of injury or death: The green indicator lights should be lit and the lights should be solid, not blinking. This diagram provides a visual guide for installation and troubleshooting of. Web a wiring diagram for liftmaster professional garage door openers, including the wiring connections for sensors, wall buttons, motor, and power supply. This number is crucial.
Liftmaster Garage Door Opener Wiring Diagram Cadician's Blog

To wire the solenoid lock, use no and c (normally open and common) terminals on the board instead of no and nc (normally open and normally closed) terminals on the board. Proceed with both sensors to the garage door opener motor unit. Web in this video we tackle a challenging garage door motor project, specifically applying the wires to safety.
Smart garage door opener for LiftMaster 3850 ismartgate

The green indicator lights should be lit and the lights should be solid, not blinking. Following the wiring instructions carefully and checking the connections will help ensure a successful and safe installation. Disconnect power and battery before installing or servicing operator. Web how to check the safety reversing sensors. Aim the sensors at each other.
garage door safety sensor wiring diagram

Aim the sensors at each other. The green indicator lights should be lit and the lights should be solid, not blinking. • run wires from both sensors to the opener as shown. Use insulated staples to secure the wire to the wall and ceiling. Safety symbol and signal word review.
Liftmaster Wiring Diagram Sensors

Disconnect power and battery before installing or servicing operator. Web overall, wiring a liftmaster garage door opener involves connecting the power supply, safety sensor wires, wall control panel wires, and remote control wires. • connect both sets of wires to the opener. Turn both the ac power and battery switches to off position before installing or servicing operator. Following the.
Liftmaster Wiring Diagram Sensors Database

• connect both sets of wires to the opener. Following the wiring instructions carefully and checking the connections will help ensure a successful and safe installation. Aim the sensors at each other. Disconnect power and battery before installing or servicing operator. Web a wiring diagram for liftmaster professional garage door openers, including the wiring connections for sensors, wall buttons, motor,.
47+ Liftmaster Wiring Diagram Pics

They can operate at ranges up to 90' and when. • run wires from both sensors to the opener as shown. Web • secure sensors with the hardware shown in figure 6. The garage door will be made by clopay and the garage door opener is made by liftmaster. Replace only with fuse of same type and rating.
liftmaster wiring diagram sensors Liftmaster wiring chamberlain
When the sensors light up, press the remote to close the door. It can be installed on all types of doors, and it has safety sensors to prevent the door from closing when an object is obstructing it. Finger tighten the wing nut on the receiving eye to allow for final adjustment. Web we can identify the model of your.
Liftmaster Wiring Diagram Sensors - Turn both the ac power and battery switches to off position before installing or servicing operator. You can also find the model information in the owner's manual or on the manufacturer's website. • connect both sets of wires to the opener. Disconnect power and battery before installing or servicing operator. Use only liftmaster approved entrapment protection devices (refer to the accessory page of manual). Web how to check the safety reversing sensors. Replace only with fuse of same type and rating. It can be installed on all types of doors, and it has safety sensors to prevent the door from closing when an object is obstructing it. Regular inspection and prompt troubleshooting will help keep your garage door system safe and reliable. Web put safety first and learn how to wire a garage door opener with sensors.
Check the owner's manual or replacement parts diagram for specific part information before ordering to. They can operate at ranges up to 90' and when. The green indicator lights should be lit and the lights should be solid, not blinking. To reduce the risk of injury or death: Web put safety first and learn how to wire a garage door opener with sensors.
Regular inspection and prompt troubleshooting will help keep your garage door system safe and reliable. Use insulated staples to secure the wire to the wall and ceiling. This particular project had high vaulted. Check the owner's manual or replacement parts diagram for specific part information before ordering to.
Check the owner's manual or replacement parts diagram for specific part information before ordering to. Safety symbol and signal word review. Web in this video we tackle a challenging garage door motor project, specifically applying the wires to safety sensors.
• run wires from both sensors to the opener as shown. Then, connect the control wires between the wall control panel, safety sensors, and the opener unit. Web to wire a liftmaster garage door opener, start by turning off power to the circuit and verifying the voltage requirements.
Use Insulated Staples To Secure The Wire To The Wall And Ceiling.
• see manual prior to servicing regarding maintenance and required safety testing. Web the sensor wiring is simple but takes time to do. Web get the liftmaster garage door support you need from chamberlain group. Securely tighten the sending eye wing nut.
Disconnect Power And Battery Before Installing Or Servicing Operator.
Aim the sensors at each other. Web overall, wiring a liftmaster garage door opener involves connecting the power supply, safety sensor wires, wall control panel wires, and remote control wires. Strip both ends of wires from each sensor and twist like colored wires together. Web we can identify the model of your liftmaster garage door opener by locating the model number on the motor unit.
When The Sensors Light Up, Press The Remote To Close The Door.
This number is crucial for obtaining the correct wiring diagram. Remove the sensors from the brackets. Web to wire a liftmaster garage door opener, start by turning off power to the circuit and verifying the voltage requirements. The green indicator lights should be lit and the lights should be solid, not blinking.
Turn Both The Ac Power And Battery Switches To Off Position Before Installing Or Servicing Operator.
To reduce the risk of injury or death: Finger tighten the wing nut on the receiving eye to allow for final adjustment. Web attach the two black striped wires under screw terminal 3. To reduce the risk of injury or death: